I received the following error "Items collection cannot be modified when the DataSource property is set" when populating the combo box with data table.
Reason:
The Items.Clear method was called while the combo box's data source was assigned.
Solution:
Need to set the combo box's data source to nothing before calling Items.Clear method
The following sample code explains this scenario clearly.
Private Sub populateProducts()
Dim SQLAdapter As SqlDataAdapter = Nothing
Try
Dim strSQl As String = "SELECT ID, ProdName FROM tblProducts"
SQLAdapter = New SqlDataAdapter(strSQl, SConnectionString)
Dim dt As New DataTable
SQLAdapter.Fill(dt)
cmbProducts.DataSource = Nothing // Need to set the data source nothing
// Comment this line to reproduce the error
cmbProducts.Items.Clear()
cmbProducts.DataSource = dt
cmbProducts.DisplayMember = "ProdName"
cmbProducts.ValueMember = "ID"
Catch ex As Exception
lblStatus.Text = ex.Message
End Try
End Sub
Wednesday, March 31, 2010
Monday, March 29, 2010
The 'Microsoft.Jet.OLEDB.4.0' provider is not registered on the local machine
I received the following error The 'Microsoft.Jet.OLEDB.4.0' provider is not registered on the local machine' in my 64-bit machine, Windows 2008 R2 when I ran by windows application.
But the same code was working fine in 32-bit machine.
Reason:
There is no 64-bit Microsoft.Jet.OLEDB Provider.
We need to forcibly build the application to 32-bit.
But the same code was working fine in 32-bit machine.
Reason:
There is no 64-bit Microsoft.Jet.OLEDB Provider.
Solution:
We need to forcibly build the application to 32-bit.
 |
Steps Goto Build ->Project Properties Under the Compile Tab ->Click Advanced Compile Option.. Set Target CPU to x86 instead of Any CPU |
Monday, March 1, 2010
Create Setup and Deployment Project Visual Studio 2008
Creating a Setup and Deployment Project
In this article I will cover the basics of creating a Windows Installer. This article will explain the step by step process of creating a Setup Project.
Step 1: Create a Sample .Net Project. I have named this project as "TestBlogProject".

Figure 1 Sample Project
Create a Setup Project
Open the TestBlogProject in the VS IDE.

Figure 2: Add New Project

Figure 3: Setup Project Dialog
There are five different templates that are available when you select the project type 'Setup and Deployment Projects'.
- Setup Project: Creates a Windows Installer project to which files can be added. This project type is the most generic of the five.
- Web Setup Project: Creates a Windows Installer web project to which files can be added.
- Merge Module Project: Creates a Windows Installer Merge Module project to which files can be added. This project type is most commonly used for using third party products.
- Setup Wizard: Creates a Windows Installer project with the aid of a wizard.
- Cab Project: Creates a Cab project to which files can be added.

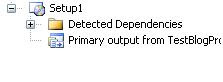
Figure 4: Default Setup Project File View
Now that we have an empty Setup Project established.
Let us discuss about the various editors that are available.
Right Click on the Setup Project and Click View.


Click on the File System
The File System (Figure 6) provides you the essential tools to work with the application folder, user's desktop, and the user's programs menu.

Figure 6: File System Editor
The first thing we want to do here is to include the relevant files and folders we wish to install on the user's machine. This is accomplished by right clicking the Application Folder and selecting 'Add'. The following screenshot is an example of something similar you may see.

Figure 7: Add Project Output
Now to add project output files to this folder, Click Project Output.

Click OK.
Merely add one or more of the files that is vital for your application by clicking on File…. Now that you have you files in place.

We could take additional steps such as manipulating the user's desktop with items such as a shortcut, as well you can add a program group to the user's program group.
Create Shortcut

Name the shortcut as you want. I have given the name as TestBlog. Drag and drop to User's Desktop Folder
Figure 9: Desktop Shortcut to application
The next item you find of immense importance is the User Interface Editor. Inside of this editor you may eliminate or include dialogs that are needed for this install project. The following screenshot is the default User Interface that is created when I initially created this setup project (See Figure 10). The only variation is that I have added a Customer Information dialog.

Figure 10: User Interface Editor
To include the Customer Information dialog that I spoke of follow the following steps.
- Under Install right click on the 'Start' node
- Choose 'Add Dialog'

Figure 11: Customer Information
- Select the Customer Information Dialog and click 'OK'
Prerequisites Installation in Windows Installer
Most applications have prerequisites: Components such as the .NET Framework runtime must be available on a target computer in order for the application to run. The deployment tools in Visual Studio include the capability to automatically detect the existence of components during installation and install a predetermined set of prerequisites — a process known as bootstrapping.
This will be achieved as follows:
To choose which prerequisites to install
- In Solution Explorer, select the deployment project and Right Click
- Click Properties.
- In the Property Pages dialog box, expand the Configuration Properties node, and then select the Build property page.
- Click the Prerequisites button.
- In the Prerequisites dialog box, make sure that the Create setup program to install prerequisite components box is checked.
- In the Choose which prerequisites to install list, check the prerequisites that you wish to install, and then click OK.
- In Solution Explorer, select the deployment project, right click.
- Click Properties.
- In the Property Pages dialog box, expand the Configuration Properties node, and then select the Build property page.
- Click the Prerequisites button.
In the Prerequisites dialog box, choose a location:- If you want to deploy the installers for the prerequisites to a vendor, click Download prerequisites from the component vendor's web site.
- If you want to deploy the installers for the prerequisites to the same location as your application installer, click Download prerequisites from the same location as my application.
- If you want to deploy the installers for the prerequisites to a different location, click Download prerequisites from the following location and enter a local path, URL, or file-share location.

- Click OK to continue.


In this article, I have covered adding a new setup project, about File System Editor, adding installer prerequisites to Windows Installer.
Subscribe to:
Posts (Atom)